Frequently Asked Questions
Still looking for answers? If the answers you're looking for aren't in our FAQ, please contact us.
How do I request a catalog?
How do I request a catalog?
You can find out complete selection of products - including supplies, equipment, and sale items - listed here, on our website. Eliminating the costs of a printed catalog is one of the ways that we are able to keep our prices so low.
Do you offer laminating services?
Do you offer laminating services?
We do not currently offer in-house laminating services. However, we've compiled a list of trusted companies in the southern California area that we can recommend. Be sure to tell them you were referred by Lamination Depot!
Custom Laminating
3160 E. La Palma Ave Suite E, Anaheim, CA 92806
(714) 632-1244
So Cal Laminating
1435 W. Collins Ave, Orange, CA 92867
(714) 639-0504
Star Laminators
43 South Rose Street, Anaheim, CA 92805
(714) 535-0000
What payment methods do you accept?
What payment methods do you accept?
- Credit card: We accept all major credit cards via our secure, PCI-compliant payment processor. All payments are subject to a multi-step verification process in order to prevent fraud.
- Net 30 terms: To apply for net 30 terms, please submit a completed credit application. Purchases must average $250 or more per month to qualify.
- Purchase orders: Public schools and government agencies automatically qualify for terms. In order to be invoiced on Net 30 terms, we require a valid purchase order. More information about purchase orders here.
- Wire transfer: Orders paid via wire transfer must be submitted by email to service@laminationdepot.com. There will be a $16.00 charge for each wire transfer received.
- Other payment processors: Apple Pay, Google Pay, Shop Pay, Venmo, and PayPal.
I'm tax exempt. How can I remove sales tax from my order?
I'm tax exempt. How can I remove sales tax from my order?
Sales tax is automatically calculated based on the zip code of your address. If you are a reseller or tax-exempt for other reasons, please email a copy of your tax certificate to service@laminationdepot.com prior to placing your order. A member of our team will review your submission, apply tax-exemption status to your account, and notify you once you can check out online without tax.
Note: If you are a reseller shipping to an address in California, please complete this tax exempt form for resellers.
Do you have a price match guarantee?
Do you have a price match guarantee?
We pride ourselves on having the lowest supply and equipment prices in the industry. If you find a lower price from a competitor, we'll not only match the price, but we'll also give you a Starbucks Gift Card as a "thank you" for choosing us! Read more details about our Best Price Guarantee.
What is your shipping policy?
What is your shipping policy?
Most in-stock non-freight items ordered before 12:00 pm PST, Monday through Friday (excluding holidays), will be shipped the same business day. Orders are shipped via ground shipping unless an expedited option is selected. Please contact customer service prior to order placement for specific deadline needs.
What is your return policy?
What is your return policy?
We are so confident in the quality of TruBind and TruLam products that we offer a 100% satisfaction guarantee. If you are not completely satisfied with your purchase, please return the product in its original packaging within 30 days of the purchase date for a full refund, minus shipping costs.
For all other eligible items, you may return the product for a full refund (minus shipping) if it is received by our warehouse within 30 days of the original purchase date, and is in like-new and resellable condition. An RMA (return merchandise authorization) number is required for all returns.
Read our policy on Returns, Refunds, Exchanges & Warranties here.
Should I save the box my machine came in?
Should I save the box my machine came in?
We highly recommend keeping the box that your machine came in, along with all packaging materials. Some manufacturers require that machines being returned for warranty repairs are packaged in their original box, and will charge a re-boxing fee for machines returned in other packaging.
How can I get a copy of the manual for my machine?
How can I get a copy of the manual for my machine?
A manufacturer's manual or operation guide is included with each laminating and binding machine. You can also find a copy of the manual for most machines in the product listing details. If you have trouble finding the manual for your machine, please reach out to our customer service team by calling (800) 925-0054 or emailing service@laminationdepot.com.
What if my machine needs repair?
What if my machine needs repair?
Many of our laminating and binding machines come with a manufacturer's warranty. Should your machine require repairs, first check if your machine is still within warranty. If you are unable to find this information, please contact our customer service team and have the order number, model number, and serial number available.
Some machines may be repaired at your location and do not require you to return them to us or the manufacturer. Otherwise, all machines must be returned at the customer's expense via insured, pre-paid freight to the address provided by our customer service team. A return merchandise authorization (RMA) must be obtained prior to returning any product. If your machine's repair is covered under warranty, it will be repaired promptly and returned to you. Out-of-warranty machines cannot be repaired by Lamination Depot.
What is the difference between glossy and matte film?
What is the difference between glossy and matte film?
Both "glossy" and "matte" laminating film are clear, but they have their own distinct uses.
- Glossy film is the most commonly used type of film, and provides the highest level of shine and clarity. It is the ideal choice if you want to keep the bright and vivid colors of your images. It's the most eye-catching type of film for images, but text can be harder to read.
- Matte film has a non-glare finish and reflects very little light, often muting some colors. Matte film is a great choice for bright environments, such as professional studios or outdoor signage. It's also more scratch-resistant than glossy film, making it ideal for frequently-handled documents like price lists and menus. Another benefit is that matte film can be permanently written on with a pen, pencil, or marker.
Can I write on it with a dry-erase marker?
Can I write on it with a dry-erase marker?
Dry erase markers can be used on glossy laminating pouches or roll film. However, depending on the brand of marker, as well as other external factors, it may not erase as well. Therefore, we recommend that you test your laminated document with different dry erase markers to determine which results are acceptable to you.
Our testing has shown that lighter colors tend to erase better over time than others, while black and red colors tend to leave a stain over time that is difficult to erase.
What are the specifications of the various film types?
What are the specifications of the various film types?
We offer a variety of film types. View our chart for more details about our film and adhesive ratios, film winding, and the running temperatures of our roll laminating film and laminating pouches.
How thick is a "mil"?
How thick is a "mil"?
1 mil represents one one-thousandth of an inch (1 mil = 0.001"). The listed thickness refers to a single side, including both the adhesive layer and the protective film layer. For example, a 10 mil pouch has a thickness of 10 mil per layer, for a total pouch thickness of 20 mil.
- 1.5 mil can be easily creased, bent, and rolled up
- 3 mil is very thin and can be easily folded
- 5 mil film is more rigid, but can still be folded
- 7 mil material is very rigid, but still pliable
- 10 mil resists any sort of bending or folding, similar to a credit card or driver's license
Will my laminating film expire?
Will my laminating film expire?
Like most adhesive-based products, unused laminating film will degrade over time. The shelf-life for both laminating roll film and pouches is generally between 18 months to two years, after which the adhesive will begin to deteriorate. When buying laminating film in bulk, it is recommended that you buy no more than what you will use in a year so that the adhesive will remain at its optimum level of performance.
Because standard laminating film is thermally-activated, it should be stored in a cool, dry place away from direct sunlight. If the film is exposed to high temperatures for an extended period of time, the adhesive may activate and the layers can fuse together (rendering the film unusable).
Is laminating film safe for the environment?
Is laminating film safe for the environment?
According to the Institute of Scrap Recycling Industries, Inc.'s publication, Scrap Specifications Circular dated 11/19/07, plastic films are considered "green" products as the films and their resins can be 100% recycled and reused.
In addition, it should be noted that by laminating paper products, the average lifespan of a paper product is extended by 7 to 10 times. By extending the life of the printed product, the need for additional paper for reprinting documents is greatly reduced, thereby creating a greener environment.
Do your products comply with the 2009 federal product safety legislation?
Do your products comply with the 2009 federal product safety legislation?
This new legislation pertains to products that are "primarily designed for children 12 and under" such as toys, cribs, strollers, etc. to protect them from unsafe levels of lead and phthalates. We do not sell any plastic products that are primarily designed for children, so this new legislation does not apply to any of our products. Although this legislation does not apply to our class of products, we can assure you that none of our products contain lead. In addition, phthalates are only found in PVC plastics. None of our laminating pouch or roll products are made from PVC plastic and therefore do not contain any phthalates.
Pouch Laminating
What size laminating pouch do I need for my document?
What size laminating pouch do I need for my document?
Laminating pouches are available in hundreds of unique sizes to accommodate the most common document sizes. Laminating pouches need to be larger than the insert document in order to achieve a proper seal, and a minimum border of 1/8" is required on all sides of your document. The dimensions listed for our pouches are the actual size of the plastic film.
To find the right size pouch for you, first measure your document, then add 1/4" to the width and height. If you cannot find the exact pouch to meet your needs, try sizing up. You can choose to either leave the larger border intact or trim it down to 1/8" using a paper cutter or a pair of scissors. Note: If the pouch that you are using is substantially larger than your insert document, then you may notice small bubbles forming in the areas where the layers of excess film meet.
If you plan to use laminating pouches with pre-punched slots, or plan to punch slots in afterwards with a manual punch, then you will need to increase the margin to account for the slot. As standard slots are 1/8" tall, you will need to account for an extra 3/8" (which includes the slot and margins around it), plus the standard 1/8" margin for your document. Therefore, a minimum of 1/2" is required on the side with the slot.
What temperature should I use for laminating pouches?
What temperature should I use for laminating pouches?
This information is supplied as a general guideline. Quite often, the laminating temperature will vary depending upon the type of material you are laminating, the accuracy of your machine's thermostat, and many other factors.
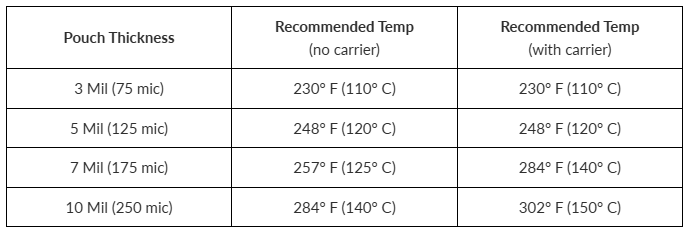
As a general rule, start with a medium temperature. If the pouch still looks cloudy after running it through your machine, laminate it at a slightly higher temperature, and then repeat this process until the pouch is clear. If the temperature is too hot, the pouch will warp, have ripples or have heat bubbles.
Do I need to use a carrier sheet?
Do I need to use a carrier sheet?
A carrier sheet is a heavy cardstock sheet folded in half, with a silicone coating on the interior folded side. Carriers are required for pouch laminators with non-silicone rollers, and are highly recommended for all other pouch laminators. Carriers protect laminating pouches from scratches during the laminating process, and also prevent excess adhesive from oozing out of the pouch and into your machine. For small pouches, carriers prevent them from wrapping around the rollers and causing jams.
To use a carrier sheet, start by inserting your document into a laminating pouch. Then place the pouch, centered inside of the carrier. Insert the pouch into your machine folded side first. Once your document passes through the laminating machine, remove it from the carrier and allow it to cool.
Because carrier sheets dissipate heat, you may have to increase the temperature of your laminator in order to achieve a proper seal. You may want to perform a test run when using a carrier for the first time to ensure that your settings are correct before laminating the actual document, referring to the owner's manual for your machine for specific instructions.
What is the difference between thermal and self-laminating pouches?
What is the difference between thermal and self-laminating pouches?
Thermal laminating pouches are made of film and heat-sensitive adhesive, and require the use of a heated pouch laminator. These are the most commonly used pouches. To use, first insert your document into the pouch, then into a carrier if required. Insert into the machine, sealed edge first, then let cool on a flat surface.
Self-laminating pouches (also called self-adhesive, self-sealing, or cold pouches) are made of film and pressure-sensitive adhesive, which are sealed with pressure by hand or by using a cold laminating machine. They are ideal for heat-sensitive documents, such as ink-heavy digital prints. To use, first place your document into the pouch face down, leaving a 1/8" margin around the edges. Then slowly roll the adhesive side onto the document, peeling off the backing as you go. Press firmly to create a seal.
Do your pouches have round or square corners?
Do your pouches have round or square corners?
All of our laminating pouches have rounded corners on all four sides.
Do any of your pouches have a pre-punched slot?
Do any of your pouches have a pre-punched slot?
Yes, we offer several sizes of laminating pouches with pre-punched slots. Should you need a slot punch on any of our other pouches, we also sell manual slot punches to enable you to punch any pouch to your specifications.
What are sticky-back laminating pouches?
What are sticky-back laminating pouches?
Sticky-back laminating pouches are similar to traditional thermal laminating pouches in that they require heat to create a seal around the document. Their unique feature is that they have an adhesive backing, which allows the laminated document to be stuck to a folder, signboard, bound presentation, or any other smooth surface. After placing the document within the pouch and running it through your laminator at the proper temperature, simply peel off the release liner on the back of the pouch to expose the adhesive and apply it to any surface you desire.
What is the best pouch laminator for me?
What is the best pouch laminator for me?
When selecting a pouch laminator, you'll need to identify the features that are the most important to your specific needs. If you will be producing a high volume of laminated documents, you may want to look for a machine with higher laminating speeds. If you regularly use thick laminating pouches, such as 7 or 10 mil, then you'll need a machine that can handle thicker pouches. If you only laminate IDs or badges, a smaller model with a 4" or 6" max width may be ideal.
Nearly all pouch laminators are thermal, using heat to fuse the layers of your document and pouch together. Machines can be equipped with either heated plates or heated rollers, each with their own benefits. For low-volume use, a machine with two rollers will be sufficient. For mid-volume use (usually offices and schools), a machine with 2-6 rollers is ideal. For high-volume use (usually professional print and copy shops), a machine with 4-10 rollers is ideal.
Most pouch laminators also offer variable temperature control, which allows you to easily adjust the heat level based on the thickness of the laminating pouch. Some also include a reverse feature, allowing you to clear jammed or misfed documents. Other popular features include: auto-shutoff or stand-by mode, cool rollers (to reduce curling), programmable memory settings, and photo lamination capabilities.
Help! My laminating pouches are not working correctly.
Help! My laminating pouches are not working correctly.
Here are some troubleshooting tips for the most common pouch laminating issues:
- Not Sealing: If your laminating pouches are not sealing properly, make sure you are laminating at the proper temperature. Check out the recommended temperature guide for our TruLam film here. Make sure to adjust the temperature if you are using a carrier. Documents with heavy ink coverage, like laser and inkjet prints, should be laminated using a photo laminator. This will ensure proper sealing, while not damaging the original document. Finally, make sure you have left a 1/8" border around your document. Trimming away more than that may result in some or all of the edges becoming exposed to moisture or humidity. When this occurs, the paper absorbs the moisture and causes the adhesive to release or delaminate.
- Cloudy: New laminating pouches will appear cloudy or milky due to the adhesive that lines the film. Once the adhesive melts in the thermal laminating process, the pouch will become clear. If your pouch still appears cloudy after laminating, increase the temperature in small increments until the cloudiness disappears. If your laminator does not allow variable temperature, then you may be using a pouch that is thicker than recommended, or using a carrier sheet for a laminator that does not require it. Refer to the owner’s manual for your machine.
- Wavy: If your laminating pouch appears wavy or rippled after laminating, decrease the temperature in small increments until the waviness disappears. If your laminator does not allow variable temperature, then you may be using a pouch that is thinner than recommended, or a carrier sheet may be required for your machine. Refer to the owner’s manual for your machine.
- Excess Adhesive: If a large amount of adhesive oozes out of your laminating pouches, decrease the temperature in small increments until the excess adhesive has been eliminated, but the laminating pouch is still sealing properly. We recommend using a carrier sheet to prevent any adhesive from sticking to your rollers and damaging the machine.
Roll Laminating
What film is compatible with my machine?
What film is compatible with my machine?
It is important to understand the key variables of roll laminating film so that you can purchase film that is compatible with your machine.
- Core size: Corresponds to the size of the mandrel that holds the film on the laminator. There are three standard core sizes: 1", 2-1/4", and 3". The size of the core often correlates to the length of the roll, since a longer roll requires a thicker mandrel to support it.
- Film grade: The quality of the laminating film, determined by the adhesive to film ratio. Standard film is made of a low-cost material, ideal for laminating standard 20lb paper with light ink coverage. Professional film has a lower melting temperature and more aggressive adhesive, ideal for digital or offset printing. Digital film has a low melting temperature, ideal for digital prints. It reduces graphic fading and protects against moisture.
- Roll width: The width of the laminating film, available as narrow as 9" to as wide as 60". Roll laminators cannot use films that are wider than their specified maximum widths, however they can use rolls that are narrower. We recommend purchasing compatible film that best matches your document size to minimize waste.
- Film thickness: A single layer of laminating film (film and adhesive). We offer as thin as 1.5 mil to as thick as 10 mil. Attempting to laminate with film that is either too thin or too thick will result in improper adhesion and can potentially damage your machine.
Are heated roll laminators better than heat shoe laminators?
Are heated roll laminators better than heat shoe laminators?
There are two primary heating methods for thermal roll laminators. Heat shoe laminators have two metal, teflon-coated heat shoes located immediately in front of the rollers. As the laminating film is pulled into the laminator, it passes over the heat shoes, which melt the adhesive layer on the laminating film. The rollers then apply gentle, uniform pressure to both sides of the film to adhere them together, encapsulating the document. Because the film has to travel away from the heat shoe to the rollers after the adhesive has been melted, heat shoe laminators generally run at a higher operating temperature. It is important to note that small scratches can occur on the film surface as it is drawn across the heat shoes.
Heated roll laminators have heating elements located within the rollers themselves, so that the heat is applied simultaneously with the pressure. They generally use less electricity than heat shoe laminators. Heated roll laminators are generally more expensive, but can be the ideal choice for print shops and other commercial businesses.
How do I load film onto my roll laminator?
How do I load film onto my roll laminator?
Every roll laminator is different, but most machines follow a similar process. First, we recommend that you only load film onto a cold machine to avoid the risk of burns. Start by removing the film mandrels from the machine. This may require loosening screws to release some of the tension. Remove the cardboard cores from any leftover empty rolls, then feed the new roll of film onto the mandrel. Note: Some roll laminators may have specialized mandrels that limit which direction the film can be loaded. Be sure to check the manufacturer's manual to avoid incorrect film winding.
Place the mandrels back onto the machine, and secure in place. For the top roll, gently pull 12"-18" of film and feed it through the rollers as directed in your manual. Leave some extra film hanging in the front. For the bottom roll, gently pull the film and feed it around the J-bar, overlapping the film from the top roll in front of the heated rollers.
Replace the feeding table and any other pieces that were removed. Insert a threading card, or any sturdy piece of cardboard, between the two heated rollers. Engage the motor of your roll laminator so that the card and film are pulled into the machine. Once they exit through the back, leave a small tail to prevent them from winding back into the machine, and trim the remaining excess. Finally, adjust the tension until any large wrinkles disappear.
Do you sell laminating film with endcaps?
Do you sell laminating film with endcaps?
We currently offer EZ Load Roll Laminating Film, which is compatible with EZ Load roll laminators, such as the GBC Ultima 65, GBC Ultima 55, and GBC Pinnacle 27. It includes grey endcaps, which help the film sit on the saddles of the roll laminator.
If you've purchased EZ Fit film but have a standard laminator that utilizes a mandrel, simply remove the endcaps and load the film onto your laminator like usual.
What binding style should I choose?
What binding style should I choose?
The binding style that is best for you depends on your core needs: document length, application, and budget. Some binding styles offer presentation and a permanent bind, wheras others offer a modular design for easy modifications.
- Spiral coils are one of the most popular binding styles among offices and print shops, and are available in a vast array of colors and sizes. Made of premium plastic material, this spine is easy to trim to your document size, and offers professional, lay-flat binding.
- Combs come in a variety of colors and sizes, and are an economical binding spine. Their design allows you to modify bound documents with ease and without damage, making it an ideal choice for documents requiring frequent updates, such as proposals or cookbooks.
- Twin-loop wire (also called wire-o and duo-wire) is a durable, tamper-resistant binding spine. It's an ideal choice for documents that need to lay flat or be completely turned to the back, such as custom calendars.
- Spiral-O wire is similar in appearance to standard twin-loop wire, but is specially designed to fit the same 19-hole punch pattern that combs use. It's an ideal choice if you already own a comb binding punch. Note: You would also need a wire-closer.
- Chicago screw posts (also called binding posts) are made up of two distinct pieces: a threaded post end and a cylinder end. It's an ideal choice for documents needing frequent updates, such as swatch books and manuals.
- VeloBind (also called hot-knife) strips are a professional-looking, tamper-resistant binding spine that uses a thermal process to seamlessly bind your document. It's an ideal choice for documents that are filed, such as reports and presentations.
What are the punch patterns of the most common binding styles?
What are the punch patterns of the most common binding styles?
Each binding style has a distinct hole pattern, and only works with binding spines that correspond to that specific binding method. The pitch refers to the number of holes in a single inch.

Wire binding uses two punch patterns: 3:1 and 2:1 pitch. The 3:1 wire binding pattern uses square holes, and has a total of 32 holes per 11" sheet. The 2:1 pattern uses rectangular holes, and has a total of 21 holes per 11" sheet.
Coil binding uses a punch pattern of 4:1 pitch, with circular holes. Most binding coils are available in 12" lengths with a total of 48 loops, which allows you to create crimped ends when binding standard documents. Some coil binding machines may punch oval holes instead of circular holes, which helps document pages to turn more easily. (Note: 4:1 pitch is the most common coil binding pattern in the United States and Europe, but other countries, such as Canada, may use a 5:1 pitch).
Comb binding uses a punch pattern of 19 rectangular holes per 11". This corresponds to the 19 prongs present on comb binding spines.
VeloBind (also called hot-knife or strip binding) uses a punch pattern of 11 circular holes, designed to work with 11-pin VeloBind strips. There are also 4 and 6-pin styles, which are far less common. 4-pin VeloBind spines can be used in conjunction with the 11-hole punch pattern, but the 6-hole hot knife strip only works with specific binding machines.
Do I need disengageable pins?
Do I need disengageable pins?
Binding machines use a die to punch the hole pattern in your documents, and each pin corresponds to the location of one of the holes. Being able to disengage some or all of the pins means that you can choose to eliminate specific holes from the punch pattern, which can help you to accommodate non-standard document sizes, specialty paper (such as three-hole punched paper), or specialty projects like calendars.
What is a modular binding machine?
What is a modular binding machine?
A modular binding machine allows you to utilize multiple punch patterns (such as 2:1 and 3:1 wire) within a single machine. They use self-contained punching dies that are inserted into the machine, rather than a built-in punch. Modular binding machines are ideal for copy and print shops that perform a variety of binding styles.
Many modular binding machines only offer punching capabilities and do not offer inserting or binding features. There are many cost-effective add-on modules (such as wire closers, comb openers, and coil inserters) to provide a complete binding solution.
What features do I need in a binding machine?
What features do I need in a binding machine?
There are many important factors to consider when comparing binding machines.
- Punch capacity is a measure of how many 20lb pages can be punched in a single pull. For example, if your machine has a 20-page punch capacity, you will need to punch in 20-page increments, or less if you are working with thicker paper or cover stock.
- Punch operation can be manual or electric, depending on the machine. Manual punches are operated with a single handle or bar. Electric punches are operated with a foot pedal or button, and often have higher punch capacities.
- Open throat allows for punching documents larger than the standard 11", by leaving the excess page length to extend beyond the punch so that the unpunched portion can be turned around, reinserted into the punch, and punched again in a second pass.
- Disengageable pins allow the user to selectively disengage punching dies in order to leave some holes unpunched. This is extremely useful when working with unusual document sizes or specialty paper (such as three-hole punched sheets). Machines can have partially or fully disengageable pins.
Coil Binding
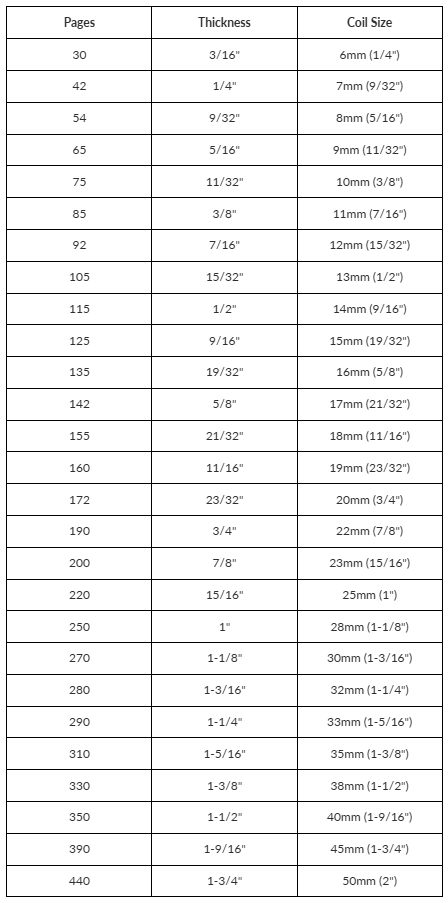
What size coil do I need for my document?
What size coil do I need for my document?
The exact diameter needed for your document varies based upon the thickness of the inner sheets of paper as well as the covers. Below is a chart that provides recommendations based on both the number of pages (using regular 20# bond) and the thickness of the stack being bound.
Do I need an electric coil inserter?
Do I need an electric coil inserter?
Electric coil inserters are motorized rollers that speed up binding time. The coil binding spine is manually inserted into the first few holes, then pressed up against the roller while it twists the coil through the remaining holes of the document. While it is possible to manually insert plastic binding coils, electric coil insertion is much faster.
How do I use coil crimping pliers?
How do I use coil crimping pliers?
Coil crimping pliers are an essential tool when binding documents with plastic spiral coil. Coil crimpers perform two distinct actions - they cut the coil to fit your document, and crimp the end so that it stays in place.
- Hold the coil crimpers so that the red dot on the top of the pliers faces up.
- Hold the document so that the coil that needs to be crimped is at the top.
- Insert the pliers so that the lower jaw is below the coil rung that you want to crimp and the top jaw is positioned above it.
- Squeeze the handles to cut the coil and continue to apply pressure until the pliers are completely closed in order to crimp it.
- Repeat the process on the other end of the coil to finish the bind.
Here is a closer look at crimping plastic spiral coils.
Comb Binding
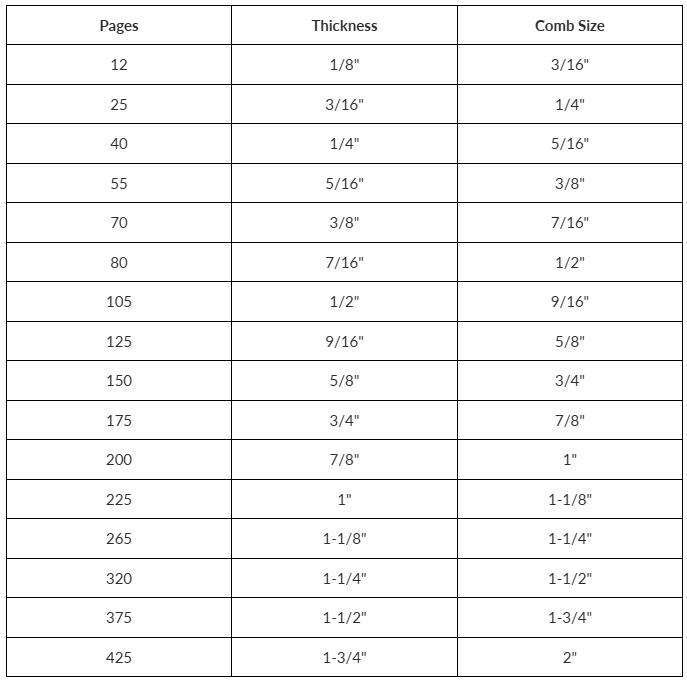
What size comb do I need for my document?
What size comb do I need for my document?
The exact diameter needed for your document varies based upon the thickness of the inner sheets of paper as well as the covers. Below is a chart that provides recommendations based on both the number of pages (using regular 20# bond) and the thickness of the stack being bound.
What features do I need in a comb binding machine?
What features do I need in a comb binding machine?
Comb binding involves two main steps: punching the document, and opening the binding comb for insertion. We offer a variety of comb binding machines with manual or electric operation for these processes, as well as some that have both. Machines with both an electric punch and opener will allow you to bind documents faster. Some machines may also offer a variety of comb openers, from plastic to metal.
It is important to note that some machines may have only one function. This allows for an operator for each process, ideal for high-production environments.
Wire Binding
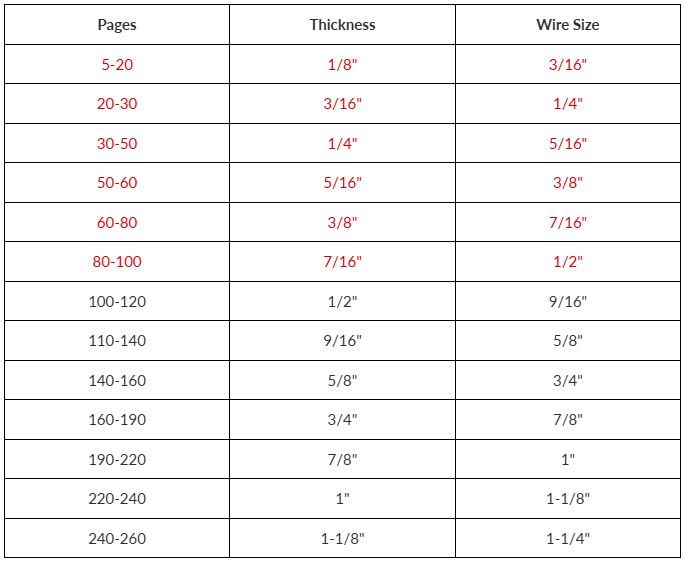
What size twin-loop wires do I need for my document?
What size twin-loop wires do I need for my document?
The exact diameter needed for your document varies based upon the thickness of the inner sheets of paper as well as the covers. Below is a chart that provides recommendations based on both the number of pages (using regular 20# bond) and the thickness of the stack being bound.
Please note: Wire sizes listed in red are 3:1 pitch; wire sizes listed in black are 2:1 pitch.
What are the benefits of binding with twin loop wires?
What are the benefits of binding with twin loop wires?
Twin loop wire binding is tamper-resistant, unlike coil and comb binding which can be easily removed and replaced by hand. Wire-bound documents require specialized equipment to unbind and rebind. They also lay flat when opened, and pages can be completely turned to the back (similar to a spiral-bound notebook) for ease of use if writing within the document.
Wire binding is also strong, versatile, and sophisticated, which is why it's the most common binding style in the legal and finance industries. Twin loop wires can also be used to create custom calendars in tandem with wire calendar hangers.
How do I make a custom calendar using wire calendar hangers?
How do I make a custom calendar using wire calendar hangers?
Wire calendar hangers are small, sturdy pieces of wire that have a shallow curve located in the center. This transforms bound documents into wall-hanging calendars. The curve is aligned with a notch on the edge of the document, created using a half-moon punch, allowing the calendar to be hung using a nail or push pin while still providing clearance for the pages to be turned.
Here is what you need to get started:
- Printed calendar document
- 3:1 pitch wire binding machine
- 3:1 pitch twin loop binding wires
- Half-moon punch
- Wire calendar hangers (Use 6" wires for calendars 6"-9", and use 10" wires for larger calendars).
Begin by using the half-moon punch to create a semi-circle notch in your document, in the center of the edge that will be bound. Then align your document in your wire binding machine so that there are an even number of holes on both sides, and punch.
Cut your twin loop wires down to the appropriate length for each side of the top edge. Then insert your pages and wire calendar hanger onto the wires, and use your wire closer to complete the bind.
Binding Covers
What are polycovers?
What are polycovers?
Polycovers are binding covers made from durable materials like polyethylene and polypropylene. They are available in a number of colors, opacities, thicknesses, textures, and decorative finishes. There are several distinct polycover finishes available:
- Leather texture covers are the most popular choice, and feature a glossy finish similar to that of treated leather
- Crystal texture covers are translucent, and have a diamond plate finish
- Grain texture covers are opaque with a medium texture and satin finish
- Sand texture covers are opaque with a fine texture and satin finish
- Hologram covers are semi-transparent, with a reflective, holographic finish
- Striped covers are translucent, and have a fine, grooved texture
What are the differences between the various clear cover styles?
What are the differences between the various clear cover styles?
Clear binding covers are the most common cover style for business reports, proposals, manuals, and more. They allow the first page of the document to be viewed without opening it, making it a great alternative to custom-printed hard covers. There are several standard clear cover styles:
- PVC covers are the most popular style, and have the widest range of sizes and thicknesses available
- Non-glare covers offer a glare-free finish
- Heat-resistant covers are designed to withstand extreme temperatures, such as during the thermal binding process or while being stored in hot facilities
- Matte-suede covers have a smooth, matte finish on one side and a pebbled texture with a frosted finish on the other side
- Matte-gloss covers have a glossy finish on one side and a satin-like, anti-reflective finish on the other that reduces glare